Friday, October 31, 2008

Book Review: Ansel Adams - 400 Photographs, Edited By Andrea G. Stillman

Written by T. Michael Testi


Ansel Adams: 400 Photographs is one of those monumental undertakings not only because of the man who created this body of work, but because of the volume of his body of work, and the number of people he influenced. To try to pare this down to 40 (Examples: The Making of 40 Photographs by Ansel Adams) or in this case 400 photographs takes time, effort, and dedication.

For those who may not know of Ansel Adams, or whom have only heard his name with relation to photography, he was the most honored American photographer of the twentieth century. Once destined to become a concert pianist he instead chose photography. Over the course of the next 50 plus years he defined the art of photography.

400 Photographs constitutes a study in that life. The book is 440 pages long and, as the title states, contains 400 of Adams' finest photographs. The book is arranged into five major periods which correspond to his growth as an artist. It is edited by Andrea Stillman, a close associate and editor of seven of Adams' books. 400 Photographs starts with an introduction in which Stillman gives a brief overview of Ansel Adams' life.

"1916-1930 – Yosemite and the High Sierra" begins when Adams was 14 years old and he visited Yosemite for the first time. He had his first camera, and on this trip he recorded a "visual diary" of where he had been. This chapter begins with some of the images he took and of the album he had made with his father. Some of these are very rare images including one of his first of "Half Dome." You can see the growth of his work between 1918 and 1927 as he developed from simple records of scenery to more artistic expressions. In 1927 he began the process that would later become "visualization." It was here that he began to photograph with much more authority and you can see the new power that his images gained.

"1931-1939 – Group f/64 and Alfred Stieglitz" shows the influence of a loose group of West Coast photographers that included Edward Weston and Imogen Cunningham called Group f/64. This group promoted "straight" photography as opposed to the "pictorialist" methods that were in vogue at the time. They were trying to define photography as an art form by simple and direct presentation as opposed to photography as relating to painting and graphic arts.

During this time the compositions of Adams' photographs began to change. He tried to present his subject in as straightforward manner as possible. He also lowered his horizon now including cloud filled skies. It was also during this time that Alfred Stieglitz, the director of America's foremost gallery of modern art, An American Place, exhibited Adams' photographs which took Adams' work to a larger audience.

Image by Ansel Adams for the National Parks Service 1942
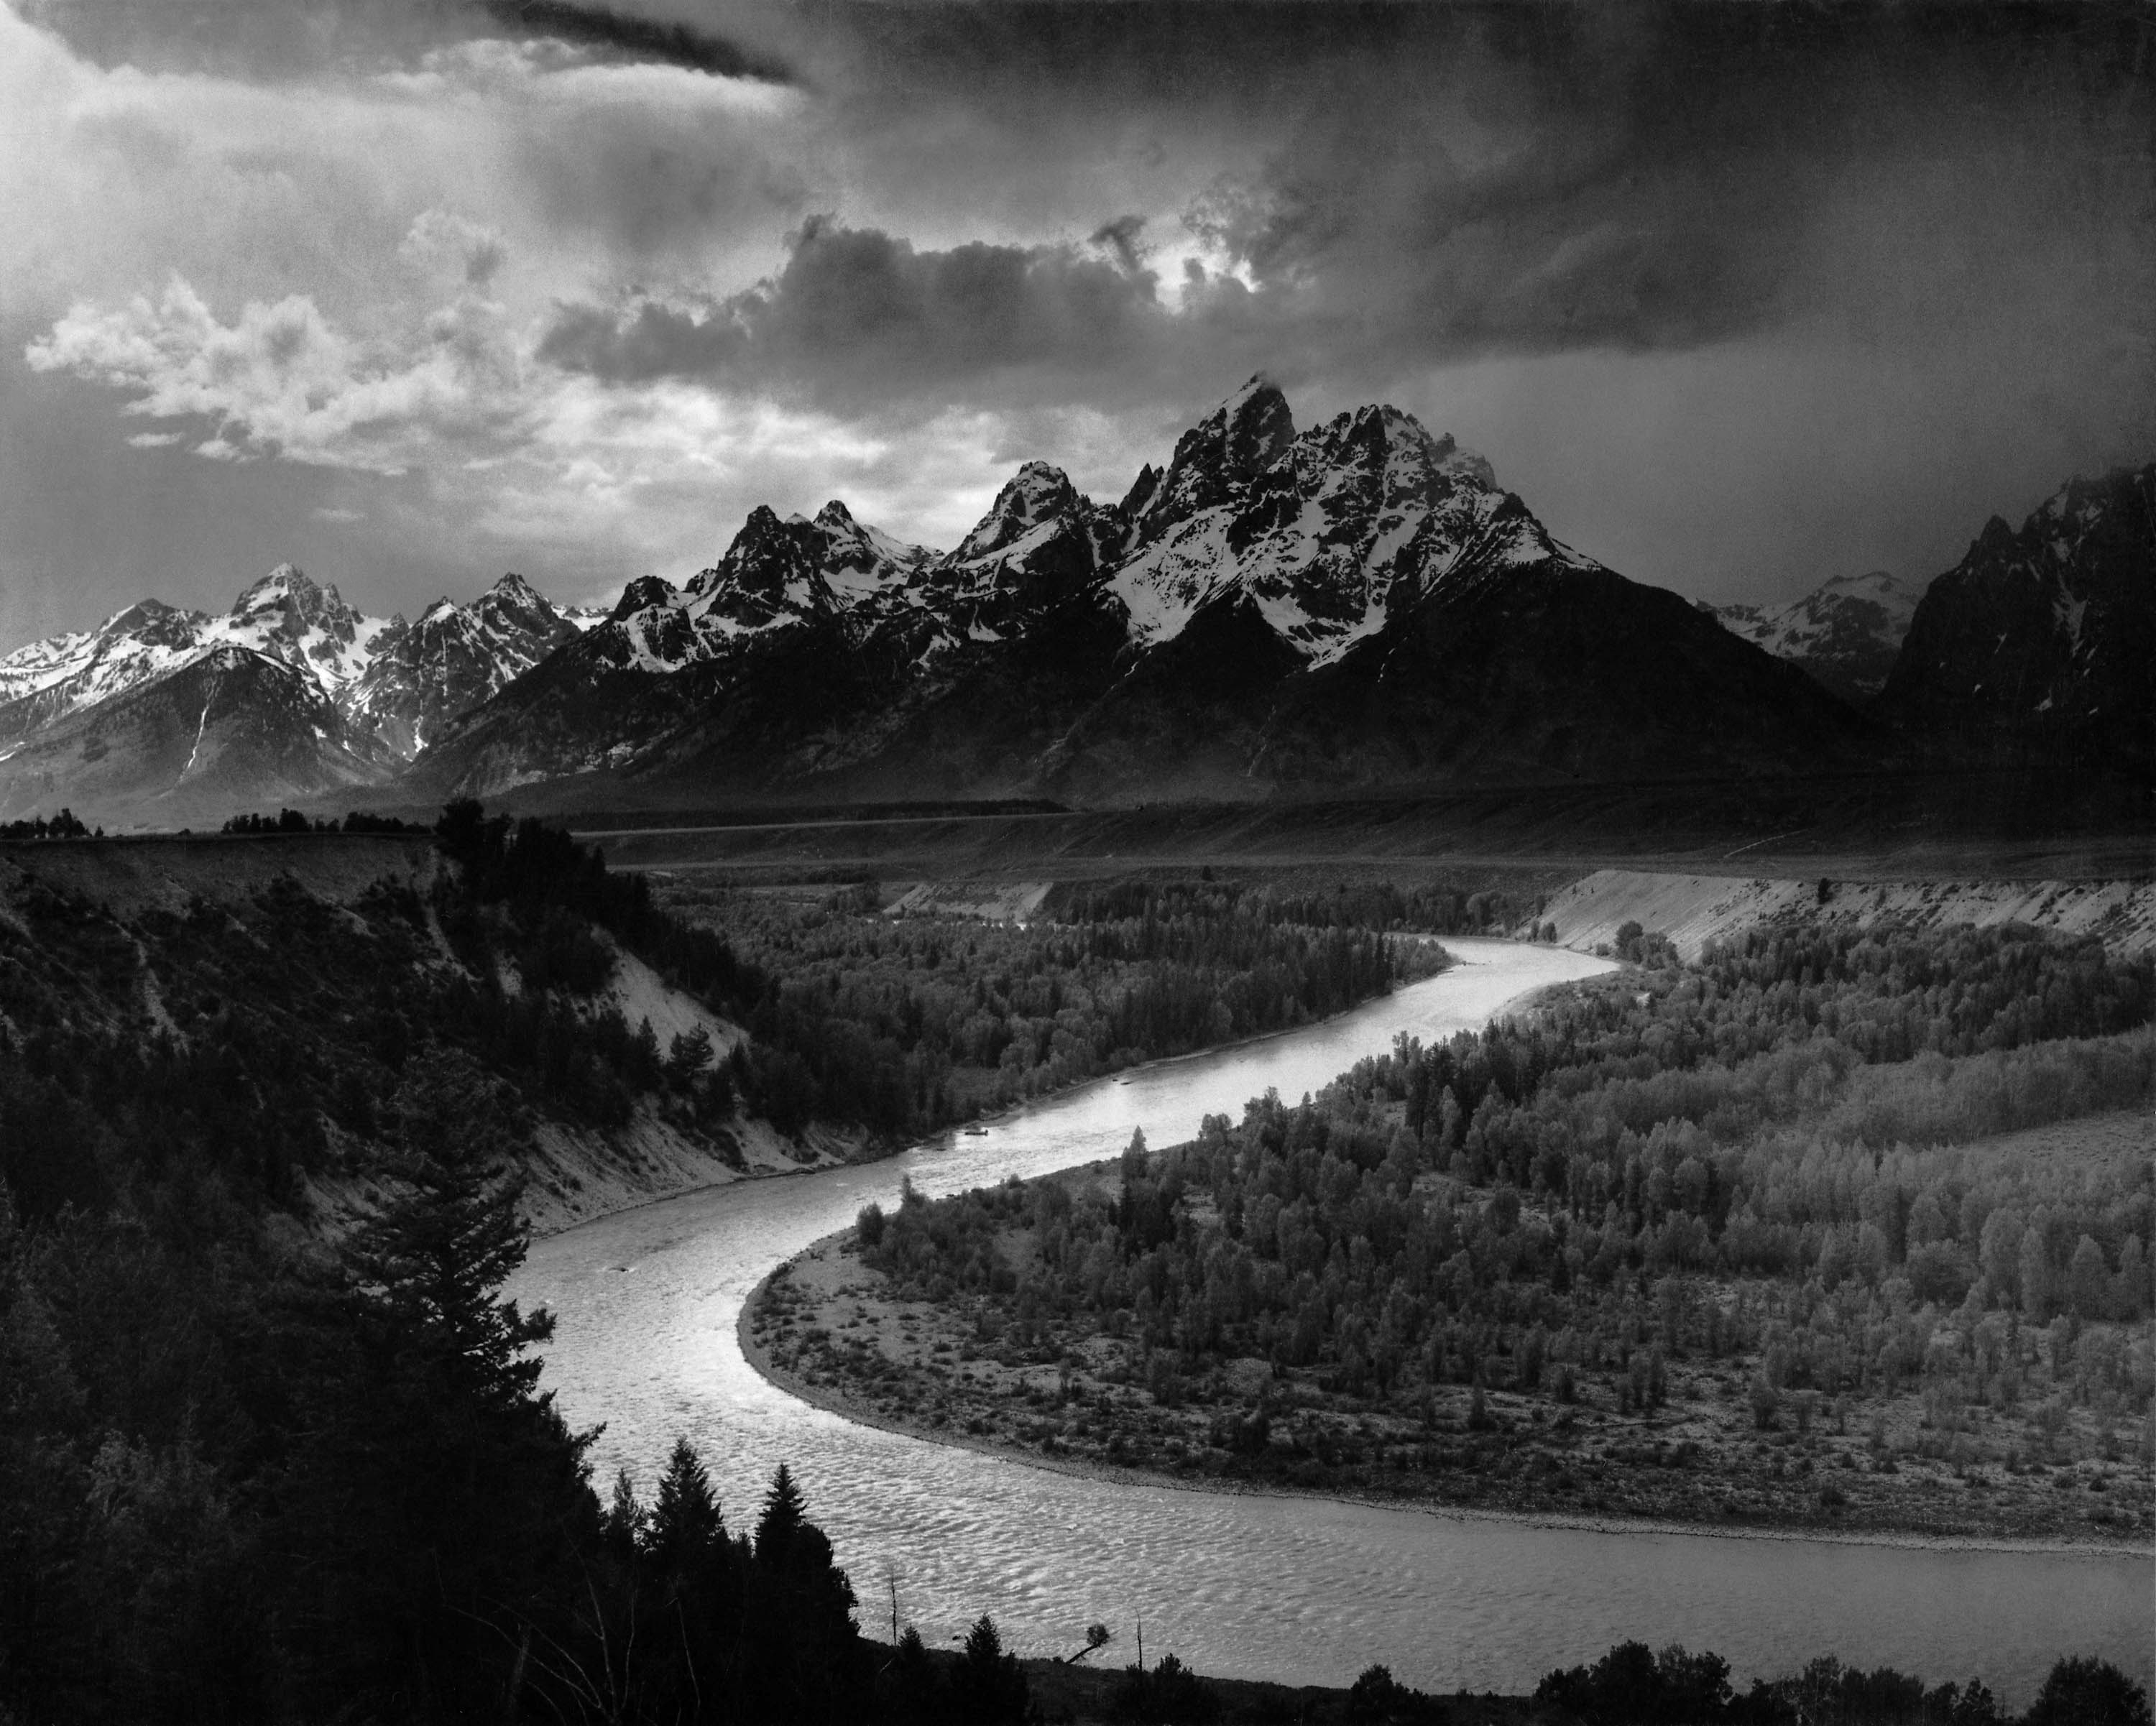
"1940-1949 – National Parks and Monuments" describes the time period in which Adams was commissioned by then U.S. Secretary of the Interior Harold Ickes to photograph the national parks and monuments for murals to be displayed in the Department of the Interior's new Washington D.C. headquarters. It was during this time period that his work grew in different geographic directions beyond California and the Southwest, branching out to other locations across the country.

"1950-1959 – Conservation, Publications, and Commissions" focused Adams' attentions on photographic commissions and writing. It was during this time that he wrote the many technical books that became standard course materials, even to this day. He also spent time working on conservation issues with the Sierra Club as well as mounting exhibitions for them.

It was in 1956 with the help of Nancy Newhall that the exhibition "This is the American Earth" was presented. It was later turned into a book with Newhall's poetic text, and characterized as a wake up call to the nation for environmental issues.

"1960-1968 – Carmel" examines the time in the life of Adams, that although he photographed less and less, he printed more and more. Adams never worked with a lab as did many of his contemporaries. He made every print himself. During this time, when he was not printing, he was writing, teaching, and tackling conservation issues.

"Notes on Selected Photographs" contains information on selected images from throughout the book. There are over 75 images that contain comments, history, and other interesting insights into the artist. 400 Photographs is fully indexed by title and by subject. There is also included a bibliography of both Adams' work as well as works on Adams.

When I was growing up, my doctor had an Adams mural on the walls in one of his patient rooms. The image to me was enormous. Even more, the impact on me of this image was enormous. It has shaped the way I viewed photography and in many ways, how I view life in general. When I view the photographs in 400 Photographs, I get this same feeling.

Sure, the small images that are presented in this book cannot replace the feeling that one gets when you see his full size presentations, but that is not the purpose of this book. 400 Photographs is about presenting a body of work from someone who chose not to make photography fit into the notion of the pictorial art of the day, but instead made photography into an art form that could stand on its own. That is what makes this book so important.

I think that Ansel Adams: 400 Photographs is an absolute must have for anyone that enjoys Ansel Adams, art work, photography, or just wants to get lost into the world of images. It is also a must have for artists from other disciplines as the compositions, arrangement of light, and locations are inspirational. It should also be in every waiting room or patient room as well; you never know whom it will inspire.

Wednesday, October 29, 2008

Book Review: Food Styling For Photographers by Linda Bellingham And Jean Ann Bybee

Written by T. Michael Testi

It is said that you eat with your eyes first. That can be derived by the fact that so many menus and restaurant advertisements have professional food stylists setting up photographic shoots to wow you with their images. But while these images really want to make you desire that dish, you would probably get ill if you tried to eat it as it was shot. In fact at the start of Food Styling For Photographers, there is a disclaimer that these methods of food preparation are not meant for human consumption.

In Food Styling For Photographers you will learn the tricks of what it takes to create that look that will have people wanting to taste the delectables. The premise of this book is that not all shoots can afford to hire a professional food stylist, or there is not the time to find one to make a deadline. As a professional photographer, there may be times in which you have to take the bull by the horns and do it yourself. Food Styling For Photographers is 272 pages and is divided into 12 chapters.

Chapter 1, "Introduction to Food Styling," begins by giving an overview of what food styling is, and to set up some rules and guidelines for the styling of food. You will see how to shop like a stylist, as well as assembling your own food styling kit. Chapter 2, "Sets and Setting," now gets in to the basics of what to consider when planning food photography; "What is the point of the shot?" In this chapter you will learn about how to properly set up the shot so as to make it pop in the image.

Chapter 3, "Chilling Facts About Cold Beverages," explains that you really have only a short window of opportunity to get the right shot when dealing with cold beverages, but with the right techniques, you can fake the effects which will let you better control the appearance and give you more latitude with that time window. Chapter 4, "Making a Salad for the Camera," begins by showing you the proper selection of ingredients so that you can build a feast for the eyes. Here you will see how to put together the proper ingredients to create a salad that has the all of the colors and textures to temp the viewer.

Chapter 5, "Pasta and Sauces," to a stylist is like a blank canvas to artist. There are a wide variety of colors and textures that can be added to the various shapes of pasta to make the viewer's mouth water. Chapter 6, "Burgers, Sandwiches and Beyond," explains that even though it may appear simple, working with burgers and hot dogs is extremely difficult to do correctly. In this chapter you will see how to locate the perfect bun, prep the patties and prepare everything just right.

Chapter 7, "Meeting Meat Head-On," begins with another warning about not eating this food, and that you should use some sort of vinyl or latex gloves when working with meat for safety reasons. Then it gets on to the various ways to cook the meat, building the layout, and even stylizing the meat when it contains bones. While the types of meats available are many, here you will work with beef, chicken and fish. Chapter 8, "Veggie Perfect," again begins with showing you how to shop for your produce, what to look for, and how to prepare it. You then will learn all of the tricks to get that fresh look just right.

Chapter 9, "Ice Cream for Hot Lights," starts off by saying that if you are selling ice cream, then you must photograph the real thing, if you are selling the topping or just using it as a prop, then you can fake the ice cream. Here the author gives a very brief talk about shooting the real thing, but this chapter focuses on creating fake ice cream. Chapter 10, "Desserts," discusses the building and shooting of whole cakes, cheese cakes, and cookies, and what it takes to get your just deserts.

Chapter 11, "Breakfast for the Camera," looks at making bacon for the camera, creating beautiful biscuits, and making eggs that pop out of the image. Chapter 12, "Garnishing Basics" finishes off by describing garnishing guidelines for making your food appeal to the viewer. Here you will see how to finish off the plate for professional look.

Food Styling For Photographers is very nicely laid out, is well written, and easy to understand. Each chapter has "Tricks of the Trade" where the authors explain little tidbits of knowledge that will help you along your path to learning how to style food. Included as well are "safety notes" to keep you safe since you are dealing with food, fire, knifes, as well as a host of other thing that can be potentially dangerous.

While I wish that there were more, and in more detail, I also like the fact that they have "Photographers Comments" on how to set up the shots that you see in Food Styling For Photographers . There are photographs of the shoot itself so that you can see the layout of the camera, lights and other things that create the photograph. You also get a list of all the supplies that were used to complete the shot.

Beyond the fact that I think that there is a need for books like Food Styling For Photographers, I think that it serves a purpose on showing what it takes to shoot for effect of sales and advertising. If you want to see what it takes to do food styling for photography then I very highly recommend this book.

Technorati Tags: ,

Tuesday, October 28, 2008

Book Review: The Adobe Photoshop Lightroom 2 Book by Martin Evening

Written by T. Michael Testi


Last August, Adobe released the second incarnation of their photography workflow product Adobe Photoshop Lightroom 2 to rave reviews. As is to be expected, Martin Evening has updated his bestselling book The Adobe Photoshop Lightroom Book to enhance his existing material as well as to reflect all of the changes to Lightroom 2.

The Adobe Photoshop Lightroom 2 Book: The Complete Guide for Photographers has been significantly updated and, as with the prior version, it was written with photographers in mind, addressing Lightroom's features from a professional photographer's perspective. This version is 624 pages in length (a whopping 272 additional pages of material) and contains 11 chapters (encompassed in 5 additional chapters).

Chapter 1, "Introducing Adobe Photoshop Lightroom," begins by describing exactly what Lightroom is, and where it fits in within your image processing workflow. Lightroom is a high quality image processer and photographic image database management system rolled into one. In this chapter you will learn about installing Lightroom as well as all about working with the Lightroom interface. Chapter 2, "Importing Photos," explains that because Lightroom is a catalog management system for your images, the first step is that you need to import images. Next you will learn about all of the options that are available to you such as converting images to Digital Negatives (DNG), using Adobe Bridge as a front end, and how imported images are organized.

Chapter 3, "Navigating the Library Module," now begins the journey into working with the various Lightroom modules beginning with the Library. This first look at the library module examines how you to use it to navigate the photos in your catalog. You will also see what tools you have available to refine your image selections. Chapter 4, "Managing Photos in the Library Module," shows you how to organize and catalog your images. Then you will see how it provides a flexible system of file management so that you can really work with your images through file naming, custom metadata, and adding keywords so that you can optimize your searching capabilities.

Chapter 5, "Working with Catalogs," examines how to work with the catalog system in Lightroom. The catalog plays a central role in Lightroom in that it keeps track of where all of your images are located as well as the information that is stored with your photos. Chapter 6, "Develop Module Image Editing," explains how to use one of the most powerful features of Lightroom, the develop module. It is this image processing module that records the changes that you want to make to an image. It stores these changes within the system, but it waits until you actually export an image before it applies the changes.

Chapter 7, "The Art of Black and White," now takes a look at how to transform your images into Black and White. Here you will learn the three main ways to convert an image as well as how not to convert your image to Black and White. You will also see specialized techniques such as creating a Black and White infrared look. Chapter 8, "Sharpening and Nose Reduction," takes on the topics of capture sharpening and noise reduction. This chapter emphasizes that importance of cleaning up an image early on, and what it takes to get that pre-sharpening done without introducing artifacts.

Chapter 9, "The Photoshop Connection," describes how you can take it to the next level when you need that extra processing that only Photoshop can provide. What you want to do is to look at Lightroom as that place where you work with, and process, many images at a time, and Photoshop where you process images one at a time. Chapter 10, "Printing," discusses how to work with the print module and how you can set up batches of images in a print queue to produce high quality prints, or work in fast mode to process quick result items like contact sheets. Best of all, to produce the best, most consistent results, you can set up custom templates to use over and over.

Chapter 11, "Presenting your Work," now shows how to present your non-printed work by using Lightroom's Web module. Here you will see how to create and upload a website of your pictures. You will also see how to create a slideshow that can be presented on computer, or exported as a self-contained presentation for business or personal use.

So what do I think of The Adobe Photoshop Lightroom 2 Book? Let me preface it by saying that I really liked the first version, but I think that this version is much better. Why? First and foremost is the fact that this one is much more complete and better thought-out. Second, is that it goes into more advanced information that is not found in similar books. You do not get the feeling that anything presented here was glossed over.

In addition, when the Lightroom first came out it was a version one product, and while the author had been using the product prior to release; back to the early Shadowland days of the product, he was probably like everyone else - still trying to figure it out from a technical, real world approach. Now, well over a year later of use, he has had the time to discern the best practices from an on the job standpoint, and in The Adobe Photoshop Lightroom 2 Book it really shows.

I think that if you don't have the first version, then, The Adobe Photoshop Lightroom 2 Book is well worth the investment. If you do have the first version and liked it, I think that this second version is worth getting as well as it really covers things in much more depth and detail. If you want to become an advanced Lightroom guru, therefore, I very highly recommend this book.


Monday, October 27, 2008

Book Review: Canon EOS 40D - The Rocky Nook Manual by Dr. Artur Landt

Written by T. Michael Testi

It seems to me that whenever dealing with technical devices, everyone has to create a manual that is dry and to the point. I would also think that that over the course of time these things would change and we could have a manual that would inspire us to pick it up and learn more. Perhaps, you would think, we could get an interesting manual that actually teaches us how to use a product rather than just describe it.

Take, for example, a Canon EOS 40D, when they spend the first weekend experimenting and looking in the manual until they learn enough to get by - and then they use those same old options over and over. It's not because people are dumb, rather it is because the manuals are not put together to inspire you to explore your new device in depth. That is where Canon EOS 40D: The Rocky Nook Manual comes in. Its goal is to inspire you to take a deeper look at your 40D and really learn how to use it. Canon EOS 40D is 200 pages in length and covers seven chapters.

Chapter 1, "Camera Technology," shows you how the Canon EOS 40D is a high performance camera that leaves very little to be desired in the way of options. It contains all of the professional features that a consumer would want in a camera and a lot more. This chapter explains what setting you should use to get the best results and which you should avoid at all costs. It targets what you really need to know.

Chapter 2, "Autofocus and Exposure," goes into what is needed to get that great shot. Most of the problems with bad exposures are from the user and not the camera. By using the highly accurate focusing mechanisms and the four basic metering abilities, you should be able to get the right shot every time.

Chapter 3, "The Camera's Exposure Modes," moves on to mastering automatic aperture and shutter speed controls by using the cameras various exposure modes to provide you with a lot of ability to use your camera effectively.

Chapter 4, "Flash Photography," explains how the flash exposure system works on the 40D. By using the built in flash system or using a compatible accessory flash unit, you will see how to make flash photography as easy as shooting in the daylight.

Chapter 5, "Using Interchangeable Lenses," shows how using the some of the 70 interchangeable lenses Canon makes, or the ones that numerous other manufacturers have available, can really take your photography to the next level.

Chapter 6, "Camera Accessories," explores the realm of other items that can enhance your use of the 40D. Things like filters - including neutral, color, and polarizers. Close-up lenses, flash units, stand-alone disk drives, camera bags, and camera shades are all included in this discussion.

Chapter 7, "Camera Output," explains that even though you can use in-camera enhancement capabilities, you would be better off to perform them off camera using specialized programs. Topics included here are data transfer, image optimization, photo printing, presenting your images, and archiving your images.

Clearly aimed at the new user, Canon EOS 40D provides an excellent jumping off point for someone who is trying to understand this complex piece of technology. It will be a comfort to those who are just starting out with this DSLR, and it provides a lot of fundamental knowledge complete with color illustrations. There are probably some good tidbits for those who have been working with their camera for a while as well.

For amateur and "new to digital" alike, Canon EOS 40D will provide you with the knowledge and insight on what you need to know to operate your new camera. If you are new to DSLRs and want to learn how to work your 40D, then Canon EOS 40D should get you off and running.


Technorati Tags: ,,,

Wednesday, October 15, 2008

Adobe Creative Suite 4 Now Shipping

Posted by T. Michael Testi

Adobe Creative Suite 4 Now Shipping 

Milestone Release Radically Improves Creative Workflow Efficiency; Redefines
Collaboration Between Designers and Developers

SAN JOSE, Calif. - Oct. 15, 2008 - Adobe Systems Incorporated (Nasdaq:ADBE)
today announced the immediate availability of the Adobe® Creative Suite® 4
product family, the highly-anticipated release of industry-leading design and
development software for virtually every creative workflow. Delivering radical
breakthroughs in workflow efficiency - and packed with hundreds of innovative,
time saving features - the new Creative Suite 4 product line advances the
creative process across print, Web, interactive, film, video and mobile.

Customers can choose from six new versions: Adobe Creative Suite 4 Design
Premium, Design Standard, Web Premium, Web Standard, Production Premium and
Master Collection. The combination of Creative Suite and the new capabilities of
Adobe Flash® Player 10, also available today (see separate press release)
deliver new levels of creativity and expressiveness across media channels.
Designers using the Adobe Creative Suite 4 product family will gain
unprecedented creative control using the new expressive features and visual
performance improvements in Adobe Flash Player 10 to deliver breakthrough Web
experiences across multiple browsers and operating systems.

"Creative Suite 4 and Flash Player 10 introduce vital time-saving features, new
levels of integration and the jaw-dropping innovations our design and developer
customers expect from us," said John Loiacono, senior vice president, Creative
Solutions Business Unit at Adobe.

"CS4 continues to fulfill our promise to customers to break down more barriers
in cross-media workflows, while also providing new services and collaboration
tools that help them manage complex client demands."

As part of the CS4 product launch, the largest in Adobe's history, also
available today are brand new versions of Photoshop® CS4, Photoshop CS4
Extended, InDesign® CS4, Illustrator® CS4, Flash CS4 Professional, Dreamweaver®
CS4, Fireworks® CS4, Contribute® CS4, After Effects® CS4, Adobe Premiere® Pro
CS4, Encore® CS4, Soundbooth® CS4 and Adobe OnLocation(tm) CS4.

Intuitive Workflows Improve Creative Efficiency

A simplified workflow in Adobe Creative Suite 4 enables users to design across
media more efficiently by making it easier to complete common tasks and move
content seamlessly among applications. InDesign CS4 includes a new Live
Preflight tool that allows designers to catch production errors and a newly
customizable Links panel to manage placed files more efficiently. The
revolutionary new Content-Aware Scaling tool in Photoshop CS4 and Photoshop CS4
Extended automatically recomposes an image as it is resized, preserving vital
areas as it adapts to new dimensions. An expanded version of Dynamic Link in CS4
Production Premium enables users to move and update content between After
Effects CS4, Adobe Premiere Pro CS4, Soundbooth CS4, and Encore CS4 without
rendering, saving countless hours in production. With deep XMP metadata support,
the production workflow is simplified, resulting in online content that gives
viewers new ways to interact with and search for video, while giving content
owners new opportunities to track and monetize content.

Adobe Creative Suite 4 brings 3D center-stage providing the ability to paint,
composite, and animate 3D models using familiar tools in Photoshop CS4 Extended.
Flash CS4 Professional now offers the ability to apply tweens to objects instead
of keyframes, providing greater control over animation attributes. Also in Flash
CS4 Professional, the new Bones tool helps create more realistic animations
between linked objects. With a searchable library of more than 450 dynamically
updated device profiles from leading manufacturers, Adobe Device Central CS4
enables users to easily test mobile content designed using many of the Creative
Suite 4 products.

New and Expanded Services Extend Capabilities for Online Collaboration

Adobe Creative Suite 4 now also offers a host of services* for online
collaboration. Adobe ConnectNow, a service of Acrobat.com, allows real-time
collaboration with two colleagues or clients. Designers can also share color
harmonies with Adobe Kuler(tm). Other online resources include: Adobe Community
Help for technical questions; Resource Central for accessing video and audio
product-related news and tutorials, as well as Soundbooth scores and sound
effects; and Adobe Bridge Home, a customizable resource for tips, tutorials,
news and inspirational content.

Pricing and Availability

Adobe Creative Suite 4 and its associated point products are immediately
available through Adobe Authorized Resellers and the Adobe Store at
www.adobe.com/store. Estimated street price for the Adobe Creative Suite 4
Design Premium is US$1799, US$1699 for Adobe Creative Suite 4 Web Premium,
US$1699 for Adobe Creative Suite 4 Production Premium, and US$2499 for Adobe
Creative Suite 4 Master Collection. To reward customers for staying current,
Adobe is offering Creative Suite 3 customers moving to Creative Suite 4 a lower
upgrade price than it offers to those moving from older, qualifying versions.
For a limited time, a special introductory offer enables customers with older
qualifying products to enjoy the same lower price with savings of up to US$200
off their actual upgrade price. For more detailed information please visit
www.adobe.com/creativesuite.

Adobe Flash Player 10 is available immediately as a free download for Windows,
Macintosh and Linux platforms (including new support for Ubuntu 7 and 8) from
www.adobe.com/go/getflashplayer.

About Adobe Systems Incorporated

Adobe revolutionizes how the world engages with ideas and information - anytime,
anywhere and through any medium. For more information, visit www.adobe.com.
 

Technorati Tags: ,

Friday, October 10, 2008

Video Training Review: Photoshop Magic With Susi Lawson

Written by T. Michael Testi

As I said in my review of her DVD training video The Fine Art of Photoshop, as soon as you see it, you can recognize a Susi Lawson work of art. There is something about it that jumps off the page and says look at me! In Photoshop Magic, Susi Lawson shares more of her techniques and insight, so you get a better feel on how to create these kinds of wonderful works of art.

 Susi Lawson – Photoshop Magic
Photoshop Magic contains 15 videos covering 13 lessons that detail how to work with Photoshop. They cover techniques of working with brushes, creating portraits by using photos to begin your creation and using Photoshop skill to enhance with drawing and painting over the image. Photoshop Magic comes on two disks, one with the videos and one with the necessary images so you can follow along.

Lesson 1, "Festive Cover Art" begins by showing you how to reproduce the cover artwork. You begin with an ordinary photograph and you will see how to create the festive look using Photoshop. This lesson covers setting the background, using selections and curves, showing you how to touch up a photo, filling in hair, and finally using vector shapes add the colorful shapes.

Lesson 2, "Air Brush Art" (two videos) now takes you on a journey to create what I consider one of the quintessential Susi Lawson styles. It has that Saturday Evening Post look to it. Here you will see how to replace the sky background and make the image look like it was shot that way. Again you will learn how to do portraiture retouching to get the best image you can.

Lesson 3, "Landscape Edit with a Punch" now diverges into the world of landscape image enhancement. Here you will learn how to add flair to your landscape by using various Photoshop tools. You start with levels and curves to do your initial adjustments. Next you work with hue and saturation, as well as the sponge tool to bring out the colors. Finally, you see how the gradient tool and high pass filter bring out the details.

Lesson 4, "Switching Backgrounds" shows you how to replace background on an image and make them more believable. Here you will see how to carefully replace an image onto a new background and see how to blend it in.

Lesson 5, "The Best Plug-in on the Net" is from optickVerve Labs' and called virtualPhotographer. VirtualPhotographer includes over 50 presets that let you automatically apply combinations of film grain, color modification, B/W, soft focus, high contrast and many artistic effects. In this video you will see how to apply some of these effects.

Lesson 6, "Fun with Filter Effects" continues in showing you how to use different effects, this time with some of the natural Photoshop filters. Here you use High Pass filter, Poster Edges, and working with the texture filter.

Lesson 7, "Fine Art Grunge" will show you more filters beginning with Find Edges to begin with a grunge feel, then working with Curve and Levels to punch things up. You work with some brushes to get that certain look, as well as using an adjustment layer to add more effects.

Lesson 8, "Draganizer Action" shows you how to work with an action that is included in the extras. This action will step you through a series of sequences that will allow you create spectacular portraitures by bringing out the subject and placing them on a dark background.

Lesson 9, "Creating Pages" (two videos) will show you how to create book pages that have that antique look and feel by creating bent, tattered, and aged pages. Then you will see how to transform it into looking like a book sitting on a table. Finally you will see how to then put an image on this book.

Lesson 10, "Slimming the Figure" will show you how to enhance an image. Here you will see how to slim the waist and arms of girl in a photo. Here you will use the clone tool, pinch tool, and the brush tools.

 Susi Lawson – Photoshop Magic

Lesson 11, "Album Page Composite" will examine how to prepare a page in an album for a senior or wedding photo composite. Here you will see how to place and adjust images, add drop shadows, and text.

Lesson 12, "Shadow Play" you will see how to add and adjust shadows behind a figure to give the image new life. Lesson 13, "Vector Art Simplified" will now take the image that you created in lesson 12 and convert it into a vector art line type drawing.

I found Photoshop Magic incredibly easy to follow along and the techniques are rather easy to use. You will find yourself amazed that these simplistic techniques are all that are needed to get such superior results. In no time, you will be able to create really great works of art. There is some unevenness between some of the videos' sound levels; that is you might need to adjust the volume on one or two of the videos, but it does not really distract from the quality of training that is given here.

Photoshop Magic is available from Susi Lawson Photography for $80.00 plus shipping and handling. Better yet, Susi also has two other videos, Portrait Magic, and The Fine Art Of Photoshop, and you can buy all three at a special bundled price.

If you are still not sure, what I suggest is that you check out Susi Lawson's gallery over at Susi Lawson Fine Art Photography to see some of her work. My guess is that before long you will find yourself wanting to see how she does it. I very highly recommend Photoshop Magic.

Thursday, October 09, 2008

Book Review: Take Your Best Shot By Tim Grey

Written by T. Michael Testi

As with a lot of books, Take Your Best Shot is one that has been years in the making. While working with the nature photographer George Lepp, Tim Grey started a quarterly newsletter called "Digital Darkroom Quarterly." Over time he kept getting questions via email asking questions on digital photography, and many times these questions were the same or similar questions. So instead of just responding to these questions, in 2001, he started the Digital Darkroom Questions (DDQ) email newsletter. To this day, these questions still go strong. Tim Grey's latest book, Take Your Best Shot, was developed from these questions. The book is 252 pages in length and is divided into 10 chapters.

Chapter 1, "Digital Fundamentals," begins with question topics that will help give you a strong foundation in digital photography and help shorten your learning curve. The goal here is that even if you have the basics down, by reviewing some of these topics you will even pick up a point or two. Topics covered here include the debate between film and digital, dynamic range, ISO, resolution, RAW capture, and lens problems such as chromatic aberration.

Chapter 2, "Digital Cameras and Tools," examines the wild and wonderful world of ever expanding digital technology. In the days of film cameras, things did not change that frequently, but with the advent of digital, things don't stay the same for very long. Now you have many choices that constantly change. Here you will learn about the differences in camera choices, cleaning sensors, memory cards, lenses, and even about some specialty accessories like Lensbabies lenses.

Chapter 3, "Digital Capture," is really a new technology in the grand order of things, and so we are all still trying to define the rules. While there are a lot of similarities between this technology and film, there are also a lot of differences. This can lead to frustration. In this chapter the author attempts to remove those frustrations by examining some of these new rules. This includes comparing RAW to JPG, why to shoot RAW, setting color temperature, when to change ISO, what color space should you use on your DSLR, and how to interpret the histogram on your image.

Chapter 4, "Digital Darkroom," is a place that you will likely spend a lot of time if you are serious about digital photography. The digital darkroom needs equipment much like the traditional darkroom, but it is dry and performed in open spaces (and it does not have that chemical smell). To build a system, there are also a lot of questions to be answered such as Windows vs. Mac, storage and backup, do you need Photoshop? Do you need Lightroom? As well as many more topics examined. Here you will get a good feel for what you might need.

Chapter 5, "Color Management," examines why there are two kinds of photographers with regard to color management; those who are frustrated with it, and those who ignore it. Topics here try to look at how to manage color. Questions answered here are about profiling camera, calibrating monitors, color spaces, how to use print preview in Photoshop, as well as color management in Photoshop.

Chapter 6, "Optimizing in Photoshop," will help you overcome the learning curve that one generally finds when learning Photoshop. In this chapter the author examines many of the common questions that people have when working with Photoshop. These include working with RAW files, Curves and Levels, Cloning and Healing, Adjustment Layers, Selections, and working with Gradient Effects on an Adjusted area.

Chapter 7, "Creative Effects," looks at some of the more advanced techniques that many use with Photoshop. As you become better, you tend to want to emulate more of what they see others do. It is not always easy to figure out how these techniques can be accomplished. Here you will learn about creating Black and White images, using Photoshop filters, adding Vignettes and edge effects, as well as reproducing classic darkroom effects.

Chapter 8, "Image Problem-Solving," takes on the adage of "I'll just fix it in Photoshop." While it is always better to "fix it in the photo," once the shot has been taken, and you are not in the field, short of going back out, you do have to fix it in Photoshop. Here you will see how to fix things like overexposed skies, removing color casts, fix motion blur, reduce haze, and clean up noise in an image.

Chapter 9, "Printing," examines what it takes to get the best image on paper. Yes there are other ways to display your work; there is just something fundamental about viewing a print. Again, each new technology brings out new questions. Here you will learn about the different types of printers, inks, sending images out to be printed, as well as other topics relating to generating a hard copy image.

Chapter 10, "Digital Sharing," provides the options for those who like to share their images. In this chapter there is a discussion on the problems that can arise with sharing your images online, as well as how to sell them online, creating slideshows, and how to use the Lightroom Web Module.

Like his DDQ, Take Your Best Shot provides a wealth of information for novices through the advanced hobbyist photographer. Many, many of the questions are ones that either are not readily available without searching through a ton of books, or when they are answered, do not provide as complete an answer as presented here.

Some of the things that make me really like Take Your Best Shot is its conversational tone. Tim Grey presents each question as it was asked to him and from there he puts forward his answer. Occasionally there is a "Pet Peeve Alert" in which he pulls out his soapbox and makes his feelings known on something that he objects to, and occasionally there is a "Let's Settle This Already" segment where he discusses a particular topic in more depth.

I have been a fan and regular reader of his DDQ's for a couple of years now, and have always found them informational, entertaining, and I always look forward to that little tidbit that I didn't know. It is for this reason that I think that Take Your Best Shot is a great book for anyone from novice to advanced amateur as well as anyone making the move from film to digital. I very highly recommend Take Your Best Shot.


Wednesday, October 08, 2008

Product Review: ExpoAperture2: Depth Of Field Guide from ExpoImaging

Written by T. Michael Testi

While taking pictures is easy, especially in this digital world, mastering the art of photography is not always clear and straightforward. There are a lot of variables to factor in and one of them is Depth of Field (DOF). The first barrier that usually makes people's eyes glaze over is that it is a mathematical calculation. It combines a number of different factors including the distance of the camera to the object being photographed, the focal length of the lens, as well as the aperture that is being used.

The ExpoAperture2: Depth Of Field Guide was developed to make this process much easier and much more accessible to the average user. While there are several versions, the one that I am reviewing is the combo pack which contains two ExpoAperture disks. The first covers standard focal lengths (15-135mm), and the second is for telephoto lens lengths (70-600mm).

ExpoAperture ExpoAperture is a tool that will allow you to take control over depth of field and let you apply selective focus within your images. This guide will show you the relationship between focal length, focal distance, aperture, and the resulting depth of field and let you make the calculations you need quickly and easily.

Just what is an ExpoAperture disk? It was invented by George A. Wallace as a companion product to the ExpoDisk. Essentially, it is a small hand calculator made of durable plastic that can fit easily into your camera bag or shirt pocket so you can always have it with you.

There are two ways to use ExpoAperture. First is to determine the aperture that will produce your desired depth of field, or to figure your depth of field by your chosen aperture.

For example, say you are using a Nikon D200 camera. The first thing is to determine the sensor size; they give you a chart to look up the sensor size, and in this case it is 1.5x. You set your sensor size on the disk (the green #1 in the image). You then rotate focus zone dial to your lens focal length, in this case 200mm (yellow #2).

You next flip the dial over to find your subjects distance, say 13 meters (red #3). Then you choose your desired depth of field, in this case, 12 to 14 meters (red #4). You count the number of alternating gray and white zones covering this depth of field (gray #5). In this case it covers about one zone. You flip the dial back over and look for that zone number on the gray ring (gray #6), in this case it is one and shows f11 (brown #7). So that is your aperture. Determining the depth of field is handled in much the same way.

I found the ExpoAperture incredibly easy to use and understand. Once you get the steps down, it makes figuring out depth of field simple and much more accurate than ever before. ExpoAperture would be a great tool for the classroom, and in fact they make a large size that can be used in the classroom setting.

If you want to have better control of your depth of field, if you want to have a tool small enough to fit in your shirt pocket, if you just want to get it right, then you need ExpoAperture. At $39.95 USD, the ExpoAperture is incredibly affordable, and is usually available for much less if you shop around. I highly recommend the ExpoAperture.


Tuesday, October 07, 2008

Book Review: Adobe Photoshop CS3 Extended For 3D And Video By Chad Perkins

Written by T. Michael Testi

There are a lot of things that Photoshop CS3 Extended can do that Photoshop has never been able to do before. These include importing and editing of video and animating any object in a file. Adobe Photoshop CS3 Extended For 3D And Video is the first book to provide a detailed look at these new features. This book is geared for both those who want to learn about video and 3D in Photoshop as well as those video producers and 3D artists who want to incorporate Photoshop into their workflow.

The goal of CS3 Extended For 3D is to get you started down the road in using Photoshop for 3D and video. Even if your workflow is print based and you think that there is nothing in this book for you, or you feel intimidated by professional grade 3D and video software packages, this book is aimed at you.

One thing to keep in mind is that because of the specific nature of this book, it does not go over how to use Photoshop. It is assumed that you are comfortable with using Photoshop and know the most basic concepts such as the interface, pallets, tools, how to work with layers and other fundamental topics. CS3 Extended For 3D is 318 pages long divided into ten chapters.

Chapter 1, "Photoshop's New 3D Abilities: The Basics," starts off by looking at Photoshop's new extended capabilities with regard to video and 3D. These include working with 3D files, transforming 3D objects, preset views, and the 3D camera tools. Chapter 2, "Playing with Lighting and Appearance Settings" now shows you how to work with the tools that will light, cut up, and change the appearance of 3D objects. Then you will see how to display wireframes, create cross sections, and learn about some rendering tricks.

Chapter 3, "Even Cooler 3D Tricks," begins to experiment and gets more creative with the tools that you have been learning about. You also begin to learn how to use them with the standard Photoshop tools. You will work with Layer Styles, adjusting color and luminance, and use Layer Masks with 3D Layers. Chapter 4, "Editing Textures of 3D Objects," tackles what may be the most important part of Photoshop Extended for 3D; the ability to alter textures on 3D objects. These changes can be made either non-destructively or permanently, all without having to go back into an external 3D program.

Chapter 5, "Creating Textures for 3D Models," goes over some of the features that are available for 3D users in the standard edition of Photoshop, especially with the creation of textures. Here you will see how to refine bump maps and create a realistic eyeball texture as well as other tips for using Photoshop in your 3D workflow. Chapter 6, "Video Basics," now shows you how to work with video in Photoshop. Once again, the basics are covered beginning with working with files, exporting video, and using audio in your productions.

Chapter 7, "Animating," shows you the six animation properties: position, opacity, style, Layer Mask position, Layer Mask enabling, and Global Lighting. Here you are shown that you can animate just about any layer. With these you can make each of those layers come to life in Photoshop Extended. Chapter 8, "Editing Video," shows you how to do just that, edit raw video footage within Photoshop. Topics covered are cutting video, filling gaps, animation conversions, as well as take advantage of other bells and whistles when it comes to editing your video.

Chapter 9, "Creative Video Techniques," now gets into all sorts of creative video techniques that you can use in your videos. You will work with styles and filters, Paint tools, cloning, healing, and the use of composting. Chapter 10, "Plug-ins and Resources," finishes up by discussing the third-party plug-in solutions that are available for use with Photoshop as well as other resources that may be useful to you.

Adobe continues to push the envelope from within Photoshop and the new extended version is no exception. While narrow in focus, CS3 Extended For 3D is quite broad within the areas of 3D and video and is a needed volume for beginners on this topic as well as those who want to use Photoshop in their workflow.

The author writes clearly and the easy to follow tutorials are great to learn from. I think that this ease comes from his background as a trainer for Lynda.com. Since this release of Photoshop is really a version 1 for 3D and video within Photoshop, Perkins is able to point out strange oddities that he has encountered which may make for an easier time for you while working in this medium.

CS3 Extended For 3D is definitely the resource that you want if looking to get into 3D and video from within Photoshop Extended. The book also comes with a CD that gives you the resources to work with to make your journey much more enjoyable. I highly recommend Adobe Photoshop CS3 Extended For 3D And Video


Monday, October 06, 2008

Book Review: Adobe Photoshop Lightroom 2 Book For Digital Photographers by Scott Kelby

Written by T. Michael Testi

Last August, Adobe released the second incarnation of their photography workflow product Adobe Photoshop Lightroom 2 to rave reviews. As is to be expected, new editions of companion Lightroom books are also coming to market to provide educational assistance to learning Lightroom. Scott Kelby's Adobe Photoshop Lightroom 2 Book For Digital Photographers, along with being one of the best, is also one of the first out of the chutes.

Adobe Photoshop Lightroom 2, while it certainly addresses the new features of Lightroom 2, also guides you through the existing features that have not changed. This version is 456 pages in length (40 more pages of material) and contains 14 chapters (3 additional chapters)

Chapter 1, "Importing," devotes it's time to showing you how to get your photos into Lightroom. The improvement I see in this chapter is that not only are you shown how to get them in, there is more devotion to figuring out where to store your files, how to set up your folder organization, shooting tethered, as well as discussing topics like the use of the Adobe DNG file format advantage. Chapter 2, "Library," focuses on organizing your photographs. Here the author looks at using Collections, Quick Collections, adding Keywords, working with Metadata, and working with multiple catalogs. This chapter is more focused on the library and some of the content from the previous edition was reorganized and moved to the next chapter.

Chapter 3, "Customizing," looks at how to set up Lightroom 2 to fit your work style. Here you will work with setting up two monitors, adding a logo to your interface, choosing what the Filmstrip will display, and learning to work with panels in a faster and much easier method. Chapter 4, "Editing Essentials," gets into the basics of developing your photos. In this chapter you will see how to set the white balance, add more punch to the color of your images, adjust the tone, hue, and color of your photos, as well learning techniques such as vignetting, getting that gritty look, and using AutoSync to fix a bunch of photos live while editing just one.

Chapter 5, "Local Adjustments," moves beyond basics to editing specific parts of your image. This includes Dodging and Burning, working with the Adjustment Brush, retouching portraits, and learning how to fix skies. Chapter 6, "Problem Photos," will show you how to correct problems after you have taken the image. Here you will work with cropping, reducing noise, removing red-eye, fixing backlight photos, sharpening, and fixing chromatic aberrations.

Chapter 7, "Exporting Images," shows you how to save your images as JPEG's, how to email photos from Lightroom, using the export plug-ins to auto upload to sharing sites like Flicker, and how to export your original RAW photo. Chapter 8, "Jumping to Photoshop," examines how to move between Lightroom and Photoshop. This includes how to get there and back again, how to add Photoshop Automation to your workflow, stitching panoramas by using Photoshop, and working with High Dynamic Range images in Photoshop.

Chapter 9, "Gorgeous B&W," begins by showing how to determine if a photo would look good in Black and White. Then you will see how to do it yourself, how to tweak individual areas, how to add a split tone, and how to create a duo tone image. Chapter 10, "Slideshow," begins with a basic slide show and quickly moves to customizing your show, adding music, picking preferences, and finally how to email the show.

Chapter 11, "Print," examines how to properly setup the print, and then moves onto adding text to your print layouts. You then see how to print multiple images on one page, how to setup your final print and management settings, and how to add borders to your photos. Chapter 12, "Web," starts off with a simple online photo gallery and then from there customizes the gallery layout by working with the layout colors, working with templates, and then shows how to put your gallery on the web.

Chapter 13, "Portrait Workflow," is the first of the workflow chapters that will give you a sense of how you should work with Lightroom from a professional standpoint. This is a step-by-step on-location shoot process that will give you a feel of how someone would use Lightroom in real life. Chapter 14, "Travel Workflow," is a different type of workflow because unlike the portrait shoot, this is geared more for those who shoot for themselves and either uses the images for family and friends, or to sell to, say, a magazine or stock agency, not to a specific client. It would work as well for those who sell fine art photos.

There is also a virtual 15th chapter that is available online from a secret location that you must own the book to gain access to. It is a video workflow that will take you step-by-step through a wedding shoot. It is unique in that you will see how Scott Kelby uses Lightroom real time and it really makes for fascinating viewing.

So what do I think Adobe Photoshop Lightroom 2? Let me preface it by saying that I loved the first version, but I think that this version is much better. Why? Two reasons that I can pinpoint directly.

First, in the 17 months since the first book was released, the author has been training Lightroom and putting on workshops. I believe that he has learned not only how better to work with Lightroom, but how better to answer the kind of questions that his workshop participants have with regard to the use of Lightroom. Second, which may also come indirectly from the first, is that while much of the content is reused from the first book, the layout is much more concise and has a much more logical order, and therefore easier to understand.

Certainly if you do not have the first version then you should by all means get Adobe Photoshop Lightroom 2, but what about if you have the first version? I think that depends on your situation and your finances. If you have the first version and have been using Lightroom for the last year or so, you can probably figure out much of the new version, but so much has changed in Lightroom since version 1.0 on which the prior version was based, I would seriously recommend upgrading to Adobe Photoshop Lightroom 2 Book For Digital Photographers as you might just learn a few new tricks. I very highly recommend this book.


Wednesday, October 01, 2008

Video Training Review: Beyond Skin: Going Deeper With Photoshop CS3 With Lee Varis From Lynda.com.

Written by T. Michael Testi

Doing photographic portraits, while rewarding, can also be a challenging skill to master. To do it professionally can take years to perfect and having the right post-processing skills and enhancement techniques are a must. In Beyond Skin: Going Deeper With Photoshop CS3, Lee Varis uses Photoshop CS3 to bring out the best in photos of people, faces, and bodies. He examines tone and contrast, color correction, retouching, and much, much more.

Your trainer for this library is Lee Varis. Lee Varis is the owner of Varis PhotoMedia, and has worked with photography and computer imaging for the last few decades. He combines digital and conventional photography with computer graphics to create images for use in advertising, commercial graphics, and multimedia. Lee's work has been featured in movie posters, on video box covers, CD covers, and in numerous brochures and catalogs.

Lee has developed a unique approach to photography that takes advantage of certain idiosyncrasies of digital capture technology to create impossible lighting effects. Lee has written several books, including Skin: The Complete Guide to Digitally Lighting, Photographing, and Retouching Faces and Bodies (Sybex) This library is divided into 29 lessons in two volumes and runs four and a half hours. I will break this review down by functional areas. You can see the full lesson listing at the bottom of this review.

Volume 1: The Basics

"The workspace" begins the lessons by showing you around the Photoshop CS3 environment, how to arrange and make custom palette arrangements, customized menus, and other tips to make your use of Photoshop much more comfortable.

"Curves" is sometimes considered one of the least understood tools in Photoshop, yet it is one of the more important image adjustment tools. In this section the instructor begins with a grayscale image so you only focus on tone and contrast and not with color. Next you add color to mix. Here you work with threshold adjustment layer to set black and white points to make your balance adjustments. You then move on to using the same techniques for working with skin tones. Once you get the contrasts, then you work for the most important color in the image; the color of skin. Finally, he finishes up with some speed techniques for streamlining your work.

"The Hue/Saturation command" takes a look at a different problem — getting the red out. This is helpful when trying to get the red tones out of the skin tones. This is done by using the hue/saturation adjustment layer. Varis then ties the curve techniques to the hue/saturation adjustments to complete this section.

"Basic retouching" takes you through the process of retouching images and the tools that are needed to fix images. These include the Healing Brush, the Patch Tool, the Clone Tool, and working with the Dodge and Burn Tools.

"Rebuilding skin" examines what to do when you have to cover up defects. There are times when you have to wipe the slate clean and start from scratch. In this case you will learn how to rebuild the skin. This is especially helpful when work with older skin, skin that has seen too much sun, or other problems.

"Depth of field" shows you how to throw the background out of focus. Typically this is done in the camera, but there are times when you need to do it in Photoshop after the fact. This not the usual technique, rather it is one that more accurately emulates the look that you would get in a camera setting.

Volume 2: Advanced Techniques

"Portrait glow" puts together color correction and retouching and adds a soft diffusion glow. Here we step back through many of the same techniques to do a senior portrait, but now with additional tips and trick to make your job easier.

"Basic sharpening" looks at a strategy for sharpening images and covers the basic techniques for getting the clearer images. Also discussed are other sharpening issues such as working with subjects on a plain background, as well as more aggressive sharpening images with motion where not everything is in the same focus.

"Combined tools" works with several tools that we have been previously working with but now combining to make the foreground figure to pull away from the background to give it more shape and effect.

"Black-and-white conversion" takes a color image, beginning with an image of a flower and show how best to make the transition to a black and white image. Here you will learn a number of techniques about the channel structure of color images and how best to take advantage of it.

"Channel mixing" works with channels in the layers and blends them together with layer masks to achieve some interesting effects. Now you will see how to shape your tones by concentrating on the black and white.

"Luminosity blending" changes from manipulating black and white conversions from color, and now applies color changes by using the black and white contrasts. Here you take luminosity and use it to your advantage by changing the tonal structure in the full color image.

"Blending continued" changes things up by this time not using the curves techniques but rather than using hue\saturation, you now use the channels techniques. This you can use when subjects are more saturated and by manipulating channels you get can better results.

"Channels continued" now takes on some other techniques for some more challenging subjects. Here he works on some darker skin using new techniques to achieve better results. You will work with highlights and contrasts to get a dramatic effect.

"Channel mixing wrap-up" finishes up by working on the adjusting the color and contrast by beginning with threshold adjustment and curves adjustment. This time you will see how to work with landscapes instead of people for great results.

I really liked the presentation within this video. While there were times where the techniques were a bit repetitive, I think that it worked for getting the point across and really showing the proper way to accomplish the task. There were no samples with this lesson, which I would have liked, but again the techniques were solid and very important if you need to work with skin and skin tones. I think that Beyond Skin: Going Deeper With Photoshop CS3 is a must view if you are needing to work with skin.

You can get Beyond Skin: Going Deeper With Photoshop CS3 only online. The online training Beyond Skin: Going Deeper With Photoshop CS3 comes in three flavors. A monthly subscription at $25 USD gets you all of the videos that are available online (approximately 30,768 videos on 458 topics at this time) or you can save a little with an annual subscription at $250 USD. A premium subscription at $375 USD per year gets all the videos as well as all of the exercise files. Take note that the exercise files are not included with the monthly or annual subscriptions. They are included only on the DVD and premium subscriptions.

You can use Beyond Skin: Going Deeper With Photoshop CS3 as a training program for the individual student, and it's also good for the college or vocational teacher looking to supplement their educational materials. It is of benefit to anyone who needs help understanding portrait retouching and working with skin. You can also try out some of the lessons for free at Lynda.com.

Beyond Skin: Going Deeper With Photoshop CS3 Lesson Listing:

Volume 1

  • Lesson 1: The workspace
  • Lesson 2 Curves and grayscale images
  • Lesson 3: Curves and color images
  • Lesson 4: Curves and skin tone
  • Lesson 5: Curves techniques
  • Lesson 6: The Hue/Saturation command
  • Lesson 7: Curves and Hue/Saturation
  • Lesson 8: Basic retouching
  • Lesson 9: The Healing brush
  • Lesson 10: The Patch tool
  • Lesson 11: The Clone tool
  • Lesson 12: The Dodge and Burn tools
  • Lesson 13: Rebuilding skin pt. 1
  • Lesson 14: Rebuilding skin pt. 2
  • Lesson 15: Rebuilding skin pt. 3
  • Lesson 16: Rebuilding skin pt. 4
  • Lesson 17: Rebuilding skin pt. 5
  • Lesson 18: Depth of field

Volume 2

  • Lesson 1: Portrait glow
  • Lesson 2: Basic sharpening pt. 1
  • Lesson 3: Basic sharpening pt. 2
  • Lesson 4: Basic sharpening pt. 3
  • Lesson 5: Combined tools
  • Lesson 6: Black-and-white conversion
  • Lesson 7: Channel mixing
  • Lesson 8: Luminosity blending
  • Lesson 9: Blending continued
  • Lesson 10: Channels continued
  • Lesson 11: Channel mixing wrap-up